How to Create Agents on DigitalOcean Gradient™ AI Platform
Validated on 28 Aug 2025 • Last edited on 19 Feb 2026
DigitalOcean Gradient™ AI Platform lets you build fully-managed AI agents with knowledge bases for retrieval-augmented generation, multi-agent routing, guardrails, and more, or use serverless inference to make direct requests to popular foundation models.
You can create agents using the DigitalOcean API or CLI, control panel, or Agent Development Kit.
Create an Agent Using Automation
To create an agent with the DigitalOcean API or CLI, provide a name, a foundation model, instructions, the project identifier, and the datacenter region. We strongly recommend adding a knowledge base so your agent can ground its responses in your own domain data, reducing hallucinations and improving accuracy.
You can use the API or CLI to get available options for these parameters:
-
To list available models and their identifiers, use the
/v2/gen-ai/modelsendpoint or thedoctl genai list-modelscommand.The first time you use a model from a provider, you must accept the provider’s terms in the DigitalOcean Control Panel.
-
To view available datacenters, use the
/v2/gen-ai/regionsendpoint or thedoctl genai list-regionscommand. -
To list (or create) knowledge bases, use the
/v2/gen-ai/knowledge_basesendpoint or thedoctl genai knowledge-base createcommand.
Create an Agent Using the Control Panel
You can create an agent with a custom configuration by defining the agent’s objective, model, and settings. You can add also a knowledge base.
To create an agent from the DigitalOcean Control Panel, in the left menu, click Agent Platform to go to the Agent Workspaces tab. Click the workspace where you want to create an agent. In the Agents tab, click Create Agent to open the Create an agent page, where you can choose a custom configuration.
Give Your Agent a Name
Choose a descriptive name in the Agent name field that reflects the agent’s role or expertise.
Define Agent Instructions
Provide clear instructions that define your agent’s identity, objectives, expertise, and boundaries. These instructions help the agent understand what role it plays, what tasks it should prioritize, and which resources it can use.
You are a travel agent. You help find airline tickets and car rentals, compare prices, schedules, and find the best deals.
You also suggest hotel, resort, or vacation rentals that cost less than $5,000 for a week.
Make sure that the recommendations you make are clear, actionable, and customized to the financial situation.
See Write Effective Agent Instructions for best practices. You can also use the agent instruction templates as-is or adapt them to your needs.
Select a Model
Agents use foundation models to interpret prompts and generate responses.
Choose a model provider from the Select a model provider drop-down list, and then from the Select model drop-down list, select the foundation model you want to use. To test models before choosing, use the Model Playground by clicking Model Playground.
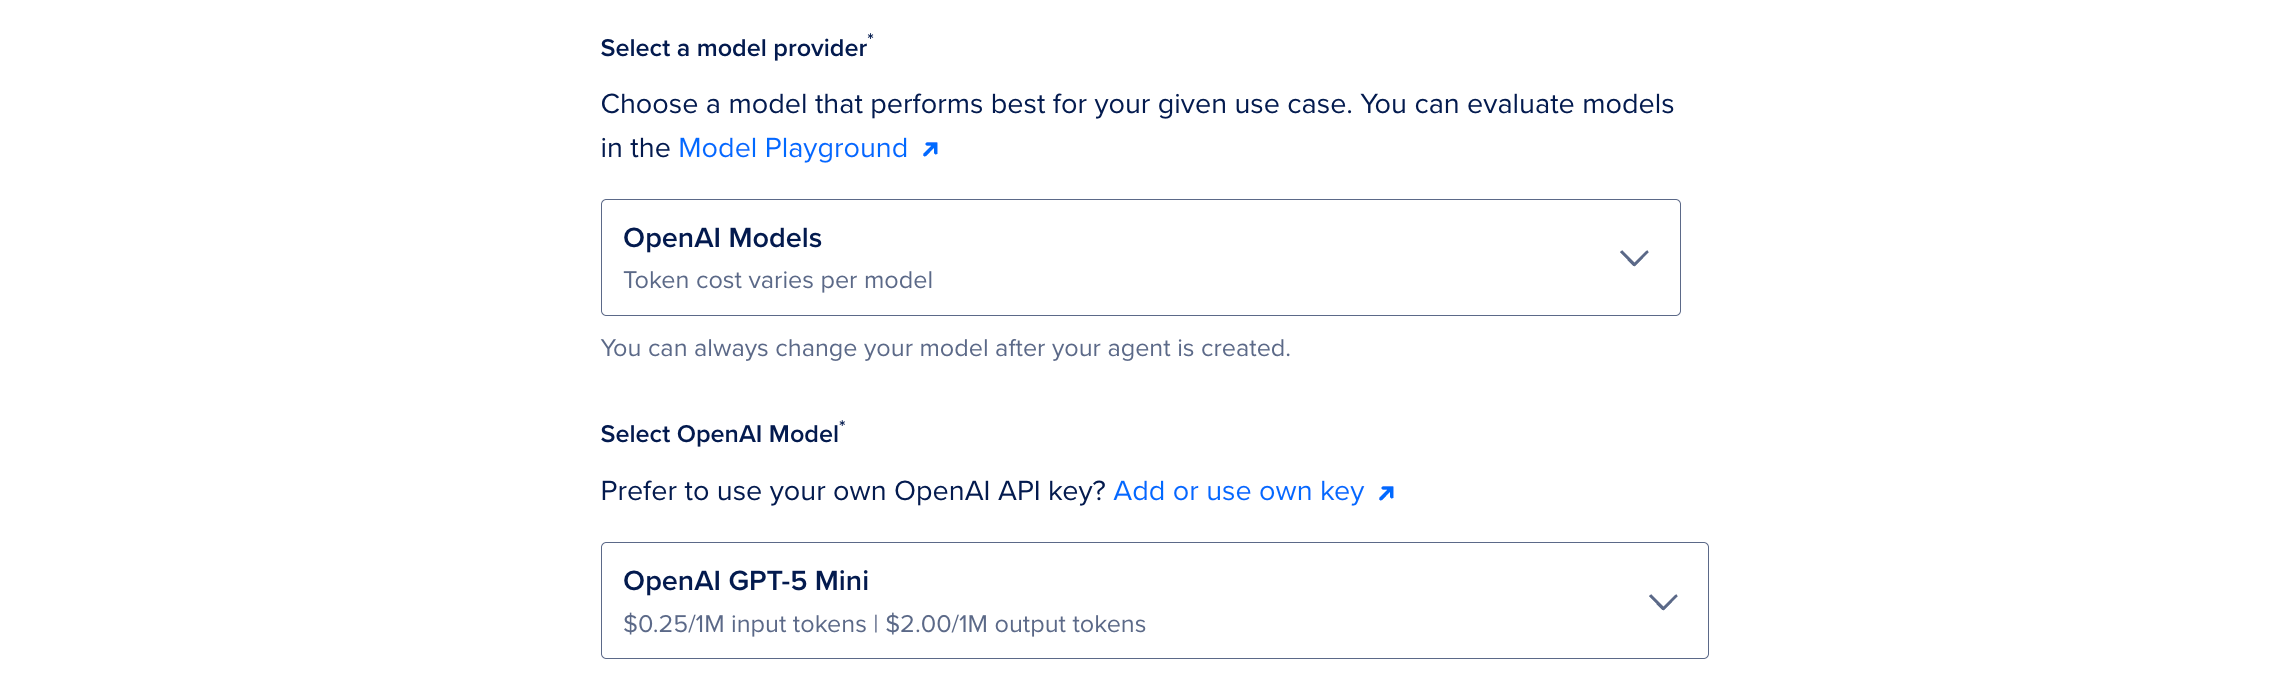
OpenAI GPT-5 is the model selected by default. You can also choose models from other providers such as Anthropic Claude, Mistral Nemo, or Meta Llama, and change the foundation model at any time after creating the agent.
Bring Your Own Model Provider API Key
For commercial models like OpenAI or Anthropic Claude models, you can bring your own API key. We bill usage directly to your model account.
Click Add or use own key above the model dropdown to open the Use or Add API Key window. If your team already has keys, choose one from the Select key or add new key dropdown menu and click Verify and Save.
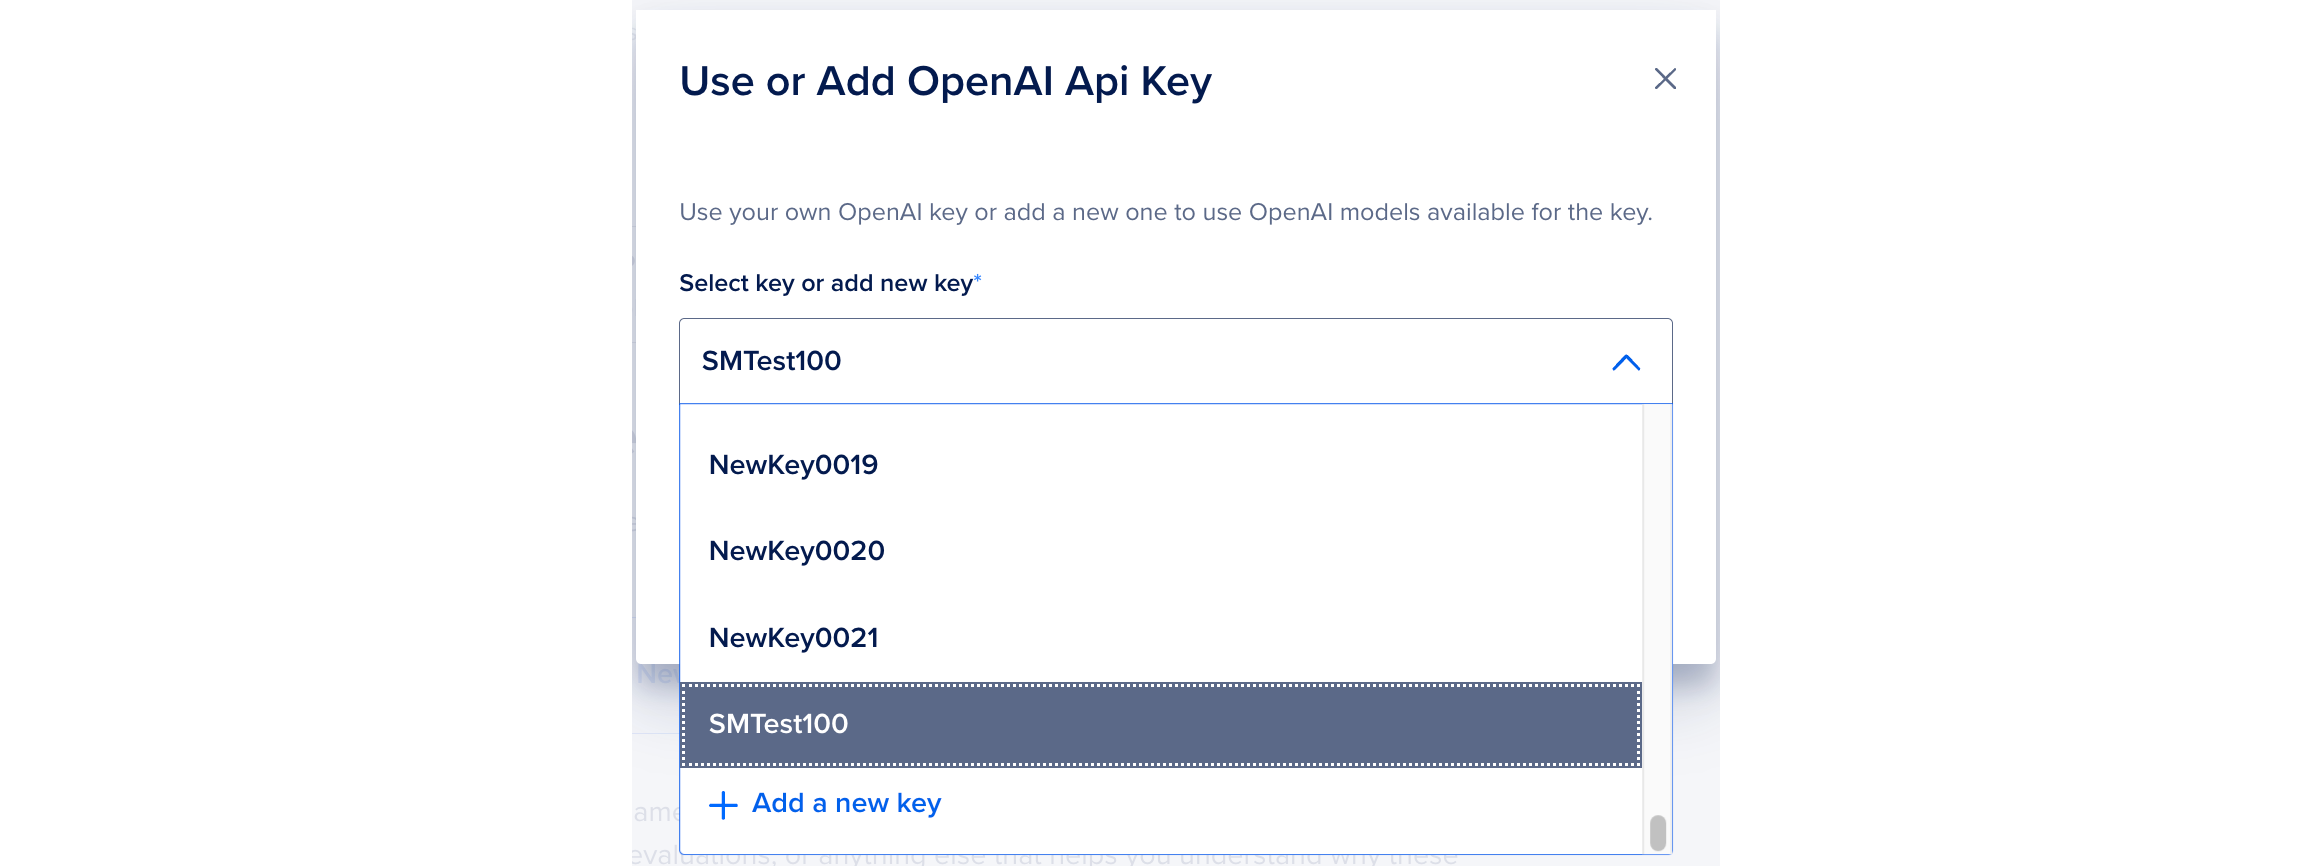
If you need to add a new key, select Add a new key. In the API key field, paste the key you copied from your OpenAI or Anthropic account. In Key name field, type a unique name without using the key itself. Names can include lowercase letters, numbers, hyphens, and periods. Then, click Verify and Save to validate the API key. After verification, we automatically select the API key in the dropdown.

In the Model Keys page, you can view, add, edit, or delete model keys.
Choose a Workspace
Workspaces group related agents together under a single space to help you organize your AI agents, share them across your team, and run evaluations to test and compare their performance in a structured way. Every agent you create exists in a workspace. By default, you have one workspace called My Agent Workspace (Created by Default).
In the Where should your agent live? section, choose a workspace for your agent. You can select an existing workspace by clicking Use Existing and choosing one from the drop-down list, or create a new workspace by clicking Create New and providing the new workspace a name and description.
Add Knowledge Bases
A knowledge base is a mixture of unstructured text files in Spaces buckets and web pages. Knowledge bases provide context to the prompt for your agent’s foundation model. Your agent uses knowledge bases to augment prompts to the foundation model, answer questions, and analyze documents. Examples of knowledge bases include product documentation, pricing, and product catalogs.
We strongly recommend adding one or more knowledge bases when creating your agent to ground its responses in your data and improve accuracy, either by selecting an existing one from the Knowledge Bases drop-down list or creating a new one.
To keep your knowledge base up to date automatically, you can also enable auto-indexing.
Finalize and Create
By default, the new agent belongs to your default project. You can choose a different project from the Select a project drop-down list.
Optionally, you can tags your agents. Tags organize related resources. Tags must be single words with letters, numbers, colons, dashes, or underscores.
At the bottom of this section, review the chosen agent resources and model token rate.
Click Create Agent to complete creating the agent. Your agent appears in the Projects section of the control panel’s main menu.
Next Steps
After creating your agent, you can:
- Route tasks across multiple agents.
- Call functions in your agent.
- Test the agent in the Agent Playground.
- Use the agent in a chatbot or application.